What is WITH this weather. Normally, I am getting my peas into the ground now. Today my ground is covered with sleet and ice and generally unpleasant forms of precipitation. And although I have read that you can just push aside that snow and plant your peas anyway, I'm not doing it. Why? Because the ground beneath is full of sleeping weeds that I didn't get to yet during the balmy weather at the beginning of the month. I am sure, based on past experience, that I will accidentally pull up peas if I weed after the fact. Also, it's damn cold out there, and I'm not that dedicated to the cause. I have another plan.
Instead, I am going to start my peas between wet paper towels placed in plastic bags, all 3rd grade earth science style. I've noticed that this somehow gives me multiple weeks jump in pea production. I believe this is because I am not good at keeping peas consistently watered, and therefore it takes them at least three weeks to come up when they go right into the ground. But if I sprout them first a little indoor, I can see their little heads peeking up through the soil within a week.
This year, I'm planting only two edible pea types - one snap pea (Super Sugar Snap) and one shelling (Burpeeana Early). I usually plant too many types, never label them properly, and never know when to pick them. I'm going to grow these in the grape beds so i can trellis them up bamboo poles while stabilizing the poles with the grapevine wire.
While I have peas on the brain, I'm also soaking some very adorable sweet peas. Contrary to what their name implies, these guys are not edible, and may even be poisonous. The flowers are beautiful though and good for cutting. I'm trying three kinds: "Color Palette Cupid" - 8" tall and destined to be a spring centerpiece on my patio table. "Explorer Mix" - 2.5 feet tall and meant for my giant deck planter. "April in Paris" - 8 feet tall. I think these will hang out in the same bed with my perfume rose.
Regardless of my hesitation, snow or no snow, those peas have to get in the ground this weekend. My pea planting schedule will not be interrupted!
Showing posts with label Growing Vegetables. Show all posts
Showing posts with label Growing Vegetables. Show all posts
Friday, March 22, 2013


Tuesday, February 8, 2011
If It's For Free, It's For Me: Garden Resources To Get Organized
Picture this: it's three months from now, and time to transplant those meticulously grown tomato and pepper plants (multiple varieties of each, of course). That means it's also time to direct sow beans, and of course, I can't just grow one kind. I take my trusty (beat-up, dirty, and badly organized) garden tool bag, my garden journal (also a mess), my seed packet pile, and my hopefully-still-properly-labeled transplants.
Then I start to wonder which plants will go where and in what order. I start jotting down some scribbly notes which make perfect sense at the time but won't make any sense in a month when stuff starts growing. At the exact moment I realize my plant tags have faded in the sun and I can't tell hot vs. sweet peppers, I will also remember that I never made a proper map of the layout. Problem. The beans don't look happy either. Were they bush beans or pole beans? Were they shelling beans or fillet beans? Suddenly, meal times become a dangerous game of Russian roulette. "Here Tom, I sauteed some Italian frying peppers" "Are they hot or sweet?" "Erm, not sure" [watches as Tom pops one into his mouth, pauses, then makes The Face] "Yes, then those would be the hot ones."
I always garden like I am being chased by a live tiger, when the tiger is in fact made out of a giant to-do list shaped like a tiger and given tiger-like properties by my active imagination. Obviously, rushing around leads to an inattention to detail that produces some crappy results. Can I be saved from myself? Who knows. But with a stubborn two feet of snow still on the ground, now is the time to get some organization skills in place. Google, take me away!
But hark! Having been forced to look for an alternative chart to share on my blog, in no time at all I found this wonderful excel spreadsheet that does the math for you. Check out the "lazy gardener's seed starting chart" at You Grow Girl. All you have to do is download it, and enter the date for your time zone. It even provides a link to the Farmers' Almanac list of frost free dates by region. This is already a huge improvement over my pencil scribble list.
Online Garden Planners: I still love my pencil/graph paper/college rule notebook. I do. But my vegetable garden has grown exponentially over the years, and I can't keep my paper templates in order. I don't have enough room to view the entire garden on one page per season as an aerial map overview, and it's really hard to keep track of crop rotations. I think my solution is to get some helpful software.
This will be my first computer-oriented gardening year thanks to Mother Earth News and their online vegetable garden planner. Although it does not belong in this article since it's only free for the first month, you can practice on the demo to see how it works and decide ahead of time whether it's worthwhile for purchase. I did the 30 day trial so I could actually start putting in my garden dimensions, and I'm finding it pretty user friendly. The demo videos show you exactly how to input your garden bed layout with its exact dimension. Once I get the bed layout put into the online map, I can click and drag various fruits and vegetables from the menu into their potential new homes. The software automatically calculates how many can fit in the space I have (which in itself is vastly useful to me since I am a pathological over-planter). Then it will help me use all this information to calculate crop rotations and succession planting. The downside to this is the yearly $24 subscription fee, and the fact that it doesn't SEEM to allow for integrating exact varieties of annual and perennial flowers among the vegetables. It has a placeholder called "flower" but that isn't the level of detail I need. But maybe I just haven't figured out how to do that party yet. If you have a small garden, I believe this application is really over kill, and probably not worth the investment. This year I will have about 18 raised garden beds of various shapes and sizes, so this might be really helpful for me, which saving Tom some unnecessary food-induced pain.
I've run into another great website with some truly free garden resources. Myfolia found me on the Twitter account that I can't seem to learn how to properly operate. It appears to be a hybrid garden planner and social networking site for gardeners. A free account let's you set your profile with your plant hardiness zone, which then links you to other gardeners in your area. It has easy connections to Twitter and Facebook, along with Flikr and other photo accounts. Aside from the community garden feel, the account lets you input and track your plantings, add journal entries, make task lists, organize your seed stash, and even arrange seed swaps with other members. This application seems more list oriented than map oriented, so it could be a good addition to the Mother Earth planner. They even have a mobile app so you can update your info FROM YOUR GARDEN! I don't know if I would use it, since I much prefer to write stuff down on random pieces of paper and lose it. Finally, wouldn't it be super neat-o to find other garden nerds in my area besides the only other one I know!?! (That would be you, Dina).
While we're working the free theme.....
Free Seeds: Oh no! This offer ends tomorrow, but I just heard about it. Click the link to the blog for Your Small Kitchen Garden and follow the instructions for getting your own free squash and tomato seeds. Move yourself up higher on the waiting list by sharing the info on Twitter or Facebook! But the generous gardener at this blog stops taking names tomorrow, so get moving.
Ed Hume Seeds will send you a seed packet in the hope that you will donate some of your veggie proceeds to the worthwhile program Plant a Row For the Hungry.
The Dinner Garden has designated national site for picking up your free seed offerings. If you don't have one nearby, you can submit your information via email for delivery via mail.
I'm stopping here, because there seem to be quite a few free seed offers once you start looking around. Also, I have given my self A LOT of homework to do as a result of this article. I need to follow my own advice and get organized.
JOURNAL NOTE: Day 7 of the tomato/pepper/herb seed under lights, and all is quiet. Hopefully by next weekend, I'll have some germination. Talk to you later!
Sunday, December 13, 2009
How Not To Grow Horseradish
I had read quite a bit on the topic by the time I trotted out of the Agway with my sandwich sized paper bag full of small stick-like horseradish roots. The main information I had taken away after skimming through a variety of sources was this: horseradish runs. Put it in the vegetable garden and those delicious underground roots will spread everywhere without concern for the rest of your plants. Some articles suggested growing them in large whiskey barrel buckets, and others suggested pots sunk into the ground. I had both my thinking cap and my smarty pants on (as they say in Sophia's preschool class) when I took three of my sticks and buried one each in various plastic pots and in turn buried the pots in different part of my garden. Therefore, let me share my tried and true knowledge about how (not) to plant horseradish.
1.) Buy horseradish roots for planting in early spring, at the same time that stores are selling seed potatoes and asparagus roots.
2.) Plant horseradish at a 45 degree angle with the growing tip pointing up. The growing tip should be only a few inches below the ground. Plant in a pot with rich garden soil, and then bury the pot in the garden up to the lip.
3.) Ignore it.
4.) The following year, notice that the topgrowth is not very significant and blame the store where you purchased them. Repeat step three.
5.) The year after that, notice that the topgrowth is better and think you ought to re-read about what you're supposed to do about it. Get distracted by brightly colored bug, or diseased crop, or wayward rodent. Remember horseradish, but join Facebook while surfing web for harvest instruction. Stop doing anything useful in life. Repeat step three.
6.) The year after that, notice topgrowth is huge! Dig up pots in late fall after first frost, only to find that horseradish was given ample time for the roots to find their way out of the (probably not deep enough) pot through the drainage holes, and is now either headed for the asparagus bed or to the Earth's core.
7.) Curse. Dig up as much of escaped root as possible, and wonder what spicy hot asparagus will taste like. Cut side shoots for processing, and replant main root in the same pathetic pot, vowing to deal with it in spring. Wonder how difficult horseradish will be to mow. Go back in the house and play Mafia Wars, or Word Twist, or Farmville, or any other stupid thing people are doing on Facebook. Tell husband you are an idiot.
OR, alternatively, you can follow the above instructions except for step 3, and harvest the roots yearly, replanting some of them for next year's crop. You probably should also not join Facebook, or start playing Mafia Wars, but that's more of a marriage counseling tip than a gardening suggestion. Just sayin'.
Wednesday, May 13, 2009
Spring Garden Progress
Now that folks in the northeast have stopped Ark building long enough to get outside, it seems like a good time for a spring garden veggie update.

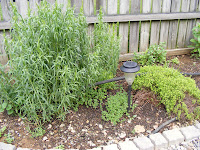 Speaking of herbs, most everything coming up now is perennial, although I'm starting to see some volunteer seedlings from last year's basil, parsley and cilantro. The big guy on the left is tarragon, with golden thyme next to it.
 Here we have chives, Greek oregano and hot & spicy oregano in front, with some chamomile and a strugglig sprig of stevia in the back. I planted the stevia this year, and also had to replace my rosemary, which never seems to overwinter for me. My sage also died after lasting a few years. I'm hoping to get a common sage along with a pineapple sage, which is gorgeous as a huge ornamental plant. If you see that variety out, you should get it and put it someplace in full sun with lots of room - and wait for the show.


Potatoes-in-Bucket are going along swimmingly (literally, considering all the rain this week). So far the bucket potatoes are twice as big as the trenched ground potatoes. However, the mulched potatoes in the tree line are barely sprouting, probably due to excessive weeds and minimal sun.
In the middle of the potatoes in this picture is my whiskey barrel of mint, which I've been growing with almost purposeful neglect for 8 years now. I usually keep three types - chocolate mint, spearmint, and peppermint. Mohitos, anyone?
 Speaking of herbs, most everything coming up now is perennial, although I'm starting to see some volunteer seedlings from last year's basil, parsley and cilantro. The big guy on the left is tarragon, with golden thyme next to it.
 Here we have chives, Greek oregano and hot & spicy oregano in front, with some chamomile and a strugglig sprig of stevia in the back. I planted the stevia this year, and also had to replace my rosemary, which never seems to overwinter for me. My sage also died after lasting a few years. I'm hoping to get a common sage along with a pineapple sage, which is gorgeous as a huge ornamental plant. If you see that variety out, you should get it and put it someplace in full sun with lots of room - and wait for the show.

Moving along to the veg, this bed is badly in need of thinning, with spinach and some out of control turnips. And lots of grass clippings because the lawn was just mowed!
Next up is the bed where half the work was done for me in the fall. The greens furthest away is a variety of arugula called rocket, or wild arugula. I had arugula in this bed last year and let it go to seed, and the seeds went everywhere. All done! The seeds germinated when they were good and ready, and I didn't have to do anything (although I also now have an arugula lawn and arugula  pathways). In front of that, I broadcast some mesculun mix a few weeks ago, and that's coming up nicely too. Both those crops are the kind you can cut and inch above the soil line, and the plants will regrow. Sow it once, and you can have salad for the whole spring and some of the summer. On either side of both crops is my slowly plodding along peas. I'm not sure how much they appreciated that week of 90 degree weather we just had, so we'll have to see how much they wind up producing this year.
The second half of this bed consists of my wall-o-waters housing early tomatoes, peppers and eggplant. The only way to get summer crops started in the ground in spring is with some type of greehouse style protection. In between, I planed a row of carrots and a row of radishes. You can just barely see one of the tomatoes peeking out over the top. Hopefully the combination of putting an early fruiting variety in the wall-o-water means fresh garden tomatoes in June!
STRAWBERRIES! This will be year 3 for my strawberry bed. Last year we were buried in strawberries for all of June. It's worth losing a bunch of space to a strawberry patch, but they need to be contained somehow or they will run right over you. Even then, it's like keeping puppies in a box. Good luck!


Early morning dew on a strawberry leaf.

This shot is of my perennial bed, which is my asparagus patch, and horseradish in buried containers. We're also in year three of the asparagus, but I feel like it should be producing better at this point. Asparagus takes a few years to really establish, so maybe I'm just jumping the gun. The horseradish are in buckets because that's another crop that will take over (underground) if left unmanaged. In back is a cover crop of rye which I have yet to till under and let decompose - the purpose of a cover crop. Hmm, not sure when I'll be getting to that one.
Onions, shallots and garlic and doing just fine.

And last but not least, the Earth Boxes are housing a variety of lettuces. It looks like the endive and lettuce are ok, but the radicchio and mache are not so hot. For more details on the Earth Box, check my blog entry from 7/29/08.
That's all the news for now. In just a few weeks - TOMATO TIME!
Friday, April 17, 2009
Potato Woes

I forgot to mention potatoes in my spring garden line-up, which is not surprising. Potatoes and I have a sordid history. One of us in this relationship is just not giving 100%, and for my part, I'm blaming the potatoes. Even with my best efforts, my potatoes tend to not live up to their potential. The potatoes, I imagine, would likely complain about my lack of consistent watering and general laissez-faire gardening style. Still, I'm not giving up just yet. Homegrown fresh potatoes are out of this world, and completely unlike anything you can get at the grocery store. So in 2009, I'm attempting three different planting methods that I haven't tried before.
1.) Trenching
1.) Trenching

This is the method I got from the handout at Agway where I bought my potato starts. Apparently potatoes don't appreciate being plopped into dense, clay-like soil and just left there. The proper way to treat them is to build up the soil around the plant at the stem, giving new potatoes room to form. In my raised bed, I dug two trenches about two feet apart, and planted potato starts around a foot apart in the row. As the sprouts grow, I'll pull down the dirt from the sides of the trench to keep the plants covered. Hopefully this will improve crop yields.
2.) Mulching
I knew there were other methods of growing potatoes, so some quick internet research resulted in a great page from Irish Eyes Garden Seeds. This page has complete start to finish potato growing tips, including two alternative planting methods. Mulching is when you prep the planting bed like you normally would, but instead of trenching, the potatoes get placed on or just below the soil. Mulch, like straw or shredded leaves, gets placed on top 6 to 10 inches deep. Continue to replenish as the stem grows, and harvest normally.
I don't have a picture of this method, but I don't have high hopes for it either. The only room I had left for them was out of the fence perimeter and solidly into the wilder parts of my yard - groundhog/mole/vole territory. Also, because it's not within reach of the hose, these guys are going to be subject to the watering schedule of mother nature herself. So, uh, yeah. Good luck out there potatoes!
3.) Cage/Garbage Can Method

The above link at Irish Eyes Garden Seeds calls it the cage method, and this eHow article talks about growing potatoes in a garbage can. Either way, this is a great method if you have space constriction, are growing vegetables in containers, or have problems in the past with diseases in your soil. As a member of the Solanaceae (Nightshade) family, potatoes are prone to the same diseases as peppers, tomatoes, and eggplant. To avoid passing these diseases through the soil from one year to the next, you should not plant potatoes (or any other family member) in the same spot for three years in a row. If you have a small garden, crop rotation by these standards is pretty much impossible unless you are using containers.
Since my potatoes religiously die back early from some kind of disease and have a low crop yield, I'm overly excited about this method. I took the hints from the Irish Eyes Garden Seeds article about planting in containers 18" across and at least 2 or 3 feet tall. I put finished compost in a layer at the bottom, and put dried chopped leaves on top. The trick here is to keep the pots watered well, which is not my strong suit. Wish me luck - and greater attention to detail.
OK, I have so many entries in my head to write, but I really ought to be taking advantage of this coolish morning to get some work done. See ya!
Saturday, March 28, 2009
Bring It On, Spring!

Early in the week, I got the news. Friday's forecast called for 65 degree temperatures, followed by a weekend of rain. You know what that means? It means that I plant seeds Friday and walk away smiling, and mother nature is stuck theoretically dragging 50 feet of hose all around the yard doing the watering. Sweet! Let's go zone 6, time to mobilize!
Laura's Comprehensive and Probably Still Too Ambitious Spring Garden Plan
Peas: Apparently, the specific date peas should be planted depends on your religious affiliation. If you are extremely religious, peas are planted on St. Joseph's day. If you are only moderately religious, but have a solid appreciation for holidays that allow for excessive alcohol consumption, then St. Patrick's day is your pea planting time. If you are a secular granola crunchy hippie, then March 15th is your day. Regardless, all these bits of advice seem to be different ways to say the same thing: plant your peas in mid-March, as soon as the ground can be worked.
When did I plant peas? I threw seeds down on March 21st, in between grocery shopping and picking Sophia up from school, because that's when I finally got around to it. Make your own assumptions. And of course, I planted two different varieties but didn't keep track of which went where, and accidentally dug them up a week later when fertilizing the beds. Let the games begin!

Garlic, Onions, Shallots: These bulbs got planted in the fall and are coming up nicely! Three 4x4 beds of garlic gave us enough harvest that we finally ran out only last week. All these can be planted now for fall harvest as well, and you can get onion sets and shallot bulbs at most big box home stores. You might have to head to Agway for the garlic though. You can try planting store garlic if you like, but those are generally sprayed with a chemical that prevents them from sprouting, so it's a bit risky.
Root Vegetables - Radishes, Turnips, Beets & Carrots: Except for the carrots, I always have easy success with this cool weather crop group. Carrot seeds don't seem to like the fact that I'm going to forget to water them regularly while they are germinating, while the others seem to be more flexible about this. That's why I like planting seeds right before the rain is due! The other seeds I pretty much just broadcast around the plot, rake or poke them into the ground and then thin as necessary.
Lettuces & Greens: My favorite thing to do is to buy a mesclun salad seed mix and lightly cover the seeds in the ground in a 2x4 foot patch. In a few weeks, you have a colorful mix of salad greens that will grow back if you cut them an inch or two above the soil line when harvesting. Easy & fresh salad all spring and early summer! If you want to be really particular ( I won't mention any names, but someone in this house meets that description), you can buy the greens separately and make your own mix. Mesclun mix usually has endive, mustard, radicchio, lettuces and a variety of other random colorful greens. This is a great beginner gardener crop, and it can really save you some money when you compare the price of seeds to bagged grocery store salads. My other favorite spring planted greens are spinach, arugula, swiss chard and bok choy, which I usually plant separately instead of mixed together.
I thought I would take it easy this spring, and not start too many summer vegetables under lights in my basement. However, the above scheme does not sound much like taking it easy. Check back for further status reports!
Tuesday, July 29, 2008
Product Placement For Which I, Unfortunately, Receive No Compensation: the Earth Box


Two questions: What is the Earth Box? And why are they not paying me to promote their product?
Well, I guess I'm not getting money or other valuable prizes because they don't know me, or care what I say. But I harbor no ill will. And as for what is the Earth Box? We must got back to the beginning - to the one and only Walter Petrosky.
Walter Petrosky is my 70+ year old Polish grandfather from the Scranton area who has 70+ years worth of wisdom to relay. Aside from being my favorite person, my grandfather is my greatest literary influence because of his particular style of leading his stories with the punchline. However, the punchline in his case usually doubles as the moral of the story. For example, my favorite stories by my grandfather begin with this line, delivered with complete sincerity in a strong Scranton accent: "Laura! (Lare-uh!) You gotta be careful with electricity (lektricity). [Pause - lean in for dramatic effect - commence pointing] Because one time, me, Bobby Touch, Jackie Mancuso (Mancuse) went up the (da) Mountain (Moun-un)...." and then things get weird, and there's something about stealing railroad tracks from the coal mine, an exposed 220 volt wire, and now my grandfather has curly hair. That's the best of the "beware of electricity" themed stories, although it would seem my grandfather has electrocuted himself no less than 5 times, and still lives so that we might all learn from his errors. He has also planted garlic upside down and nearly gotten bitten by a rattlesnake while picking blueberries ("We were up the mountain! We got paid five cents a pail! We shared one pair of shoes!"). Hints from Heloise, look out! These are good tips, all delivered Walter Petrosky style.
So how am I going to bring it back around from an elderly Polish man to the Earth Box? Here I go people, check me out. My grandfather has always sponsored my hobbies. Apparently in college, he felt my hobbies were eating peanut butter and drinking A-Treat lemon-lime soda by the case. Walt had that covered. Then when we bought our first house and took up renovating, we received a constant supply of Sears Craftsman tools. Now that gardening is my latest preoccupation, he's on the lookout for new and better gear for me at all times. So when Johnny Schwartztraubber's tomatoes became the talk of the block, my grandfather was on it.
It was explained to me, with much directional gesturing, that Johnny had bigger and more tomatoes on two plants than the guy with the garden across the street, or so-and-so from down the block, and the reason was that he was planting his tomatoes in a raised plastic box on casters. Not one to dilly-dally, I immediately became the owner of two such contraptions.
The Earth Box is essentially a raised bed on wheels. It's a self-watering system, which means that the bottom of the box is a reservoir that holds water and keeps the dirt above it on a perforated platform. The soil absorbs water as needed, keeping itself evenly moist. All you have to do is keep topping off the water. It also comes with the soil, the casters to move it in and out of the sun, a tight fitting plastic mulch cover and fertilizer. The complete instructions detail exactly how many of each type of a variety of seedlings should be planted, how they should be placed in the box and where the fertilizer goes. It's pretty fool-proof and is great for decks, since it's easy to roll around. An additional accessory kit comes with the trellis for tomatoes or other tall plants.
It's fool-proof all right, but how did I fare? Well, pretty ok, even for me. FOR ONCE, I followed the directions when planting my lettuces and only put in as many as they said and arranged them properly. I didn't even water regularly, but was still rewarded with an entire spring's worth of pest-free delicious lettuces that I cut an inch from the root so that they regrew. They were twice the size of the same lettuces that I planted in the garden at the same time. It really and truly rocked. Now, as far as the tomatoes, I couldn't resist the urge to plant only two, and put in three, which was not good. I also didn't keep watering regularly, resulting in something called blossom end rot, where the tomatoes gets black soft spots. The lack of regular watering and tight spacing stressed the plants, and now they picked up some sort of wilt. However, the tomatoes I did get were the first of the season, I believe because the box heats the soil sooner, speeding up the growth process. The tomatoes are still coming, but the ones in the garden are in better shape.
My final assessment? If you are a new gardener, or have limited space in the garden, or have ample deck space for containers, or just feel like it, get yourself an Earth Box system. And when you do, take a bit of a time out to thank Walter Petrosky for his enthusiasm, his dedication, and his knack for self-electrocution. Clearly, it has worked out for the best.
Friday, April 25, 2008
Tomato Lust ... Awww, Yeah

Well folks, I have gone and done it. It's April 25th in my zone 6 garden, and my first round of tomatoes is properly planted and watered. I am super excited, and the early pangs of maniacal tomato lust have begun.
If you are not a gardener, you are saying to yourself, "Lady, you are a FREAK. Tomato lust? Seriously? Besides, what's the big deal, anyway. I can get in my car right now and go to the store and get an organic tomato. I have a Whole Foods."
If you are a gardener, you are saying to yourself, "Lady, you are an IDIOT. You're going to lose those to frost, or at least stunt their growth. Everybody knows you don't plant summer crops until at least mid-May, and even then, Mike McGrath says June 1st is better."
To that I say the following:
1.) Whole Foods - well goody for you, but I am not impressed. If you are eating a tomato in April in New Jersey, it is likely not grown in New Jersey, picked green, ripened in-transit with gases, and even after all that, winds up being a variety that doesn't taste that great. AND even if it was grown in New Jersey and picked ripe, it was in a greenhouse, and it's still not the same. If you love tomatoes, and I mean LOVE tomatoes in a somewhat inappropriate way, you must must must grow your own, pick them perfectly ripe, and eat them straight from the vine. Which leads me to my next topic.
2.) Tomato Lust - There are two kinds of tomato lust: the kind that ends in -itis, and the kind that ends in -ism. Tomato Lustitis is a summertime temporary virus. It starts in July and August with the onslaught of the "Jersey Fresh!" signs, and the popping up of random farm stands. You hear your tires squeal at you swerve to the side of the road, hop out of your car, and start buying them by the bushel. Tomato sauce, tomato slices, tomato salad, tomato SALSA, SUN-DRIED Tomatoes, FRIED GREEN tomatoes, T O M A T O I C E - C R E A M!!!! And yet the instant your tomato frenzy reaches a fever pitch, it violently recedes, leaving in its tsunami-like wake nothing but a few leftover skins, and the dull realization that if you see another tomato you will literally throw up in your own shoes.
Tomato Lustism is something quite different. A cross between religion and affliction, Tomato Lustism is a quiet dark force lurking far beneath the surface of many completely normal looking human beings. You might THINK you're having a conversation with someone about current events, but that person is off in his or her own world thinking, "Will my San Marzanos produce enough this year for canning, or will I be stuck with the Romas? And is the cage I built strong enough for the Brandywines? And why won't this person stop talking about Darfur when I have mulch to refresh?"
Not only do these victims think obsessively about tomatoes, but they also possesses a need to grow more tomatoes that ripen earlier, take up less space, and taste better than anyone else's tomatoes. Taking a page from the Book of Dennis Leary, tomato lustism does not lead to other vegetable addictions, but to carpentry (see above image). Only 2.5 people reside in my house, yet a minimum of ten tomato plants will be planted, eight of which will be indeterminate heirloom varieties plus the two token early hybrids, just so I can brag about having garden frnesh tomatoes in early July. Did I lose you at "indeterminate"? It's OK. That means that you are free from the above mentioned illness, and should remain so ... unless you keep reading these posts and find your mind wandering...
3.) In my final point, I speak to other gardeners. Just how do you plant tomatoes in April in a zone 6 garden? Why, with Wall-O-Waters of course! This is my favorite tomato trickery. I start seeds under lights in the basement in February, put out the WOW's in the raised beds in March or April, and ta da! The WOW's warm the soil so you can get your plants in early, and then protect them at night from chilliness. Of course, for best early tomato results, you should put in an Early Girl, or some other super early hybrid, but at the moment I've got 3 San Marzanos, 2 Sugar Snackers, 1 Brandywine and 1 Purple Calabash ready to plant. So maybe none of these guys will be producing in June (my ultimate tomato goal), but my caprese salad is going to be the cat's meow. Now, if only we could get a handle on the homemade mozzarella cheese...but that's another day, another blog entry.
Subscribe to:
Posts (Atom)


